 Tip No.1: Emergency Wheel Truing
While mountain biking, you are open for taking a digger unexpectedly. There might be one or two drop-offs or more. Should your wheel goes bent out of shape, try this. First, remove the wheel from the forks (or frame, if it's the rear wheel). Grab the wheel with both hands at the point directly opposite the worst bend in the wheel. Then swing the wheel over your head and slam the wheel into the ground, to knock the bend the other way. Check the wheel, repeat if necessary to get it rideable. Take out the remaining wobbles with a spoke wrench if necessary.
Tip No.2 : Pedal Change
When removing or installing pedals, first shift the chain onto the big ring. This will prevent your knuckles from being gourged by the chainring should your hand slip.
Tip No. 3: Cutting Cables
Before cutting gear or brake cable housing, insert a short length of old cable into the housing at the point which is to be cut. Remove the excess cable after cutting. The old cable will prevent the teflon liner from crimping, making installation of a new cable a breeze.
Tip No.4: Derailleur Cable Change
When changing an old, frayed rear derailleur cable, don't throw it away. If only the end is frayed and the rest of the cable is in good condition, you can still use it for the front shifter.
Tip No.5: Bottom Bracket Installation
When installing a bottom bracket, wrap a few rounds of teflon tape (the kind used for plumbing) around the threads on the cups. This will make subsequent removal easy and may also prevent the ingress of moisture and dirt into the bottom bracket.
Tip No.6: Marking The Chain
Mark the outer plate of one link of your chain with nail polish. This way, you'll be able to see clearly where you've started lubricating the chain and where you'll need to stop.
Tip No.7: Toeing in V-Brakes
Although Shimano advises that it is not necessary to "toe-in" V-brakes, slight toeing-in helps to eliminate the annoying squealing that can sometimes give other trail users advance warning of your arrival. (Toe-in means angling the brake pads such that the front of the pad touches the rim wall first.) For easy toeing-in, stick some fabric-backed adhesive tape (duct tape) onto a short section of the rim. Loosen the brake pad and align the pad and rim so that the rear of the pad touches tape and the front touches the rim. Tighten the pad. The brakes will be automatically toed-in.
Tip No.8: Crossed Cable Routing
Sometimes certain cable routing configurations can cause the cable housing to rub against the head tube of your frame. This can mar the finish of the frame, or worse still, wear through the paint and cause rust spots. You can avoid the abrasion by routing the left hand control cables (brakes and shifters) to the cable stops on the the right side of the bike, and vice versa. For example, route the cables for the rear shifter and right brake lever (if they engage the rear brakes) to the cable stops on the left side of the head or top tube, and the front shifter to the cable stops on the right side. You'll have to cross some of the cables (under the down tube if bottom-routed, or over the top tube if top tube-routed) as they make their way to the rear stops on the frame.
Tip No.9: DIY Helmet Padding
This is a great tip to keep your helmet smelling fresh. Before each ride, stick a sanitary napkin (yes, the sort women use) on the inside of your helmet so that it will rest against your forehead once you put the helmet on. The advantages:
- the sanitary napkin will absorb your sweat and prevent it from stinging your eyes;
- it will act as padding;
- it's replaceable, unlike conventional helmet padding;
- it's medicated and perfumed, keeping you helmet bacteria-free and sweet-smelling.
And no, Tampons won't work...hehe
Tip No.10: XTR Rear Derailleur Tip
If you are a lazy sod and prefer the wait-until-it-stops-working-before-working-on-it approach to bicycle maintenance, you will appreciate this tip. The return spring on Shimano XTR rear derailleurs can be set to a "strong" setting. Turn your bike upside down, and you'll be able to see a Phillips screw in the derailleur parallelogram at one end of the return spring. Use a screwdriver to turn this screw, which is cammed and will stretch the spring a little more. This stronger spring setting can help overcome the friction in your derailleur cable housings, so you can put off lubricating the cable housings for just a few weeks longer. Use this extra time to ride your bike instead. (Note: Some very old Shimano derailleurs (like 1993-vintage Deore DX model) also have this lovely feature.)
Tip No.11: Handle Bar Controls
When installing bar-ends, shifters and particularly brake levers, tighten the mounting bolts just enough so that if you crash, the bar-ends, shifters or levers will move or rotate on the handlebars rather than breaking or bending. You'll have to spend a few minutes at the trailside to re-adjust the controls, far better than having to spend money at the bike shop for replacement parts.
Tip No.12: Installing Grips
If you're installing handlebar grips at home, you may not have compressed air available to blow the grips on. Try the following methods instead:
- Pour hot water over the grips. The heat will expand the grips slightly and the water will temporarily lubricate the insides of the grip. Quickly and firmly slide the grip onto the handlebar. The warm water will evaporate shortly and and the elasticity and tackiness of the rubber will keep the grips in place.
- Apply hair-spray onto the insides of the grips. The fluid will act as a lubricant, enabling you to slide the grips on. The alcohol in the hair spray solution will evaporate after a short while leaving a sticky residue that will keep the grips in place.
- Apply paint to the insides of the grip. This works on the same principle as the hair spray, but is a more secure and waterproof solution. The downside is that the paint is messy and may permanently mar the handlebar finish. It'll also complicate subsequent removal and re-installation of the handlebar controls.
In all cases, remember to first clean the handlebar and grips with soapy water to remove any oily residue.
Tip No.13: Granny Ring Change
If your smallest chainring is worn and needs to be replaced, you can re-use the old chainring by flipping it over. Chainrings wear on the leading edge of each tooth, where the tooth comes into contact with the inner surface of each link in the chain. The trailing edge never wears. Because the granny ring (the smallest chainring) does not have any ramps, pins or profiled teeth to assist shifting, you can safely flip it over so that the trailing edge of each tooth now becomes a leading edge. You now have a granny ring that not only performs like a new ring, but also is slightly lighter!
(A chainring needs replacement is you experience "chainsuck". Look at the profile of the teeth: if it is hooked or resembles a shark's fin, the chainring needs replacing.)
Tip No.14: Bottom Bracket Removal
When removing a tight Shimano-style bottom bracket, you'll have to be careful that the bottom bracket tool doesn't slip from the splines on the BB mounting rings. A slipped tool can damage the splines, especially if the lockrings are aluminium. To prevent the BB tool from slipping, insert a rear quick release skewer though the BB axle. (This only works for hollow axles.) Tighten the quick release so that it secures the BB tool in place, using appropriately sized spacers or washers if necessary.
When unscrewing the BB, place the bike (with its wheels installed) on the ground, right way up. Stand on the opposite side of the bike (ie if unscrewing the right BB cup, stand on the left side of the bike). Bend over the tob tube to reach the BB. Once you've broken the locked thread slightly, unscrew or loosen the quick-release skewer.
If the BB still doesn't budge, remove the wheels and clamp the BB tool in a vice. Unscrew the BB lockring by turning the whole frame. The frame will act as a very long lever, and you ought to be able to remove the stuck BB using only moderate force.
Don't forget that the RIGHT side of the bottombracket on most conventional bicycle frames is REVERSE THREADED. This is the opposite of the threading for pedals.
Tip No.15: Duct Tape (the universal fix)
If McGyver were a mountain biker, he wouldn't ride without duct tape. It's a cheap universal fix for emergencies: you can use it to temporarily fix a cut sidewall on your tyre, as field dressing for wounds (particularly deep cuts), and as temporary repair for delaminated shoes, to name a few. I've even used it to repair a saddle that had parted company with its rails, and to keep my GPS receiver in place after crashing and breaking its handlebar mount. Duct tape can make the difference between a long trudge back to the cars and being able to continue with your ride.
You can carry duct tape on your bike bike by winding a small roll around your seatpost.
Tip No.16: DIY Parang Holster
Some hashers and adventure bikers have taken to carrying a parang (machete) on their rides, but how to safely attach a parang panjang (a full-length machete) to your bike? Here’s how to make a holster that can be attached to the top tube of your bike, courtesy of Pigpen. First, you’ll need a parang, of course, which can usually be obtained relatively cheaply (about RM20) from local hardware stores. Other things you’ll need are:
- a suitable length of PVC piping (the kind used for plumbing, also obtainable from hardware stores);
- a drill with an appropriately-sized wood bit;
- 2 sturdy zip-ties that will fit into the hole made by the drill bit.
PVC piping is sold by length and comes in various diameters. Select a pipe with a diameter that is slightly greater than twice the width of the blade at its widest point divided by 22/7 (pi). So if your blade is 35mm at its widest, a pipe with a diameter of 25mm should suffice:
D = 2 x 35mm ÷ 22/7 = 22.27mm
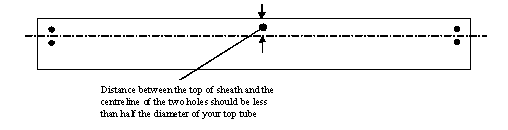
Cut the pipe to a length that is slightly longer than the length of your blade. (A pipe about 20 inches long should cost not much more than 3 ringgit.) Then, when your spouse is out of the house, carefully heat the pipe over the kitchen stove to sufficiently soften the PVC so that you can flatten the pipe into a sheath. I find that using a small wooden block wrapped in cloth to press evenly over the softened PVC pipe works well. Next, drill 4 holes into the now-flattened pipe, two near each end of the pipe. You needn’t drill all the way through both walls of the holster, just one wall will do. The 2 holes at each end should be positioned vertical to each other, about 2cm apart (depending on how big your top tube is). The holes should placed such that the top of the scabbard does not jut past the top of your top tube once attached to the bike:
Thread a zip-tie through both holes at each end of the holster, and secure the zip-ties around the top tube, making sure that the ties don’t interfere with the rear brake and derailleur cables. You may also wish to line the top tube with a bit of old inner tube first, not only to protect the finish of your frame (if frame finish is important to you) but also to stop the zip-ties slipping against the top tube each time you pull your parang in and out. A note on zip-ties: be sure to use good quality ones; cheap ones tend to pull out under load. Black ones are also apparently more durable in withstanding UV radiation that makes the white ones turn yellow and brittle.
Some concerns have also been expressed (usually by well-meaning family members) on the risk of the parang slipping out of its sheath in a crash and inflicting a mortal wound on the rider. I reckon this is unlikely, especially with longer parangs and a properly-made sheath, but you may address these concerns by attaching a nylon strap or webbing onto the handle of the parang and looping the strap around the head tube. Straps, webbing and buckles can be obtained at the Jaya DIY hardware store located on the 3rd floor of Jaya Supermarket in Section 14, Petaling Jaya, which incidentally, according to widely travelled DIY-men, is the best hardware store per capita in the world.
Finally, you may need to lengthen your front brake cable and housing if the handle of the parang interferes with the cable as you turn the handlebar left and right.
Tip No.17: Cable Housing Lubrication
Often, poor shifting on your bike can be traced to too much friction in the cable housings. This is the case if your derailleur (particularly the rear one) hesitates when changing from a larger cog to a smaller one (though not on the XTR RapidRise reverse-pull derailleurs). You ought to lube the cable housings at least once every few months, even if they are Teflon-lined. Here’s an easy way to get the cable housings out of the cable stops on your frame without undoing the cable-fixing bolt on the derailleurs and having to readjust the derailleurs thereafter. First, shift your gears into the big-big combination (ie put the chain onto the largest cog at the rear, and the largest chainring in front). Next, without pedalling the bike, shift the gears down into the smallest cog and smallest chainring. Note that your chain should not have moved from the big-big position, since you didn’t turn the cranks. Voila! You’ll find that there’ll be sufficient slack in the cables for you to slip the housings out of the cable stops on your frame. You can then drip chain lube into the ends of the housings and apply grease to the cables.
If you run full-length cable housings, this tip won’t work for you, although in theory your housings should be less susceptible to contamination. Also, some rare frames may not have split cable stops; with these, you’ll have to undo the derailleur fixing bolts.
Tip No.18: Getting More B-Tension
If the upper or jockey pulley on your rear derailleur interferes with the largest cog on your cassette, you can get more clearance by screwing in a little more the "B-tension" screw on your rear derailleur. (This screw, located on the upper link of the rear derailleur, points to the rear of the bike and pushes against a tab on the frame's derailleur hanger.) But sometimes (especially if you use a 34T largest rear cog), the jockey pulley still interferes with the large cog even with the B-tension bolt screwed all the way in. You can use a longer screw, or instead screw in the B-tension bolt from the opposite direction, so that the head of the bolt now rests against the tab on the hanger. The height of the bolt might be able to give you the additional length for the jockey pulley to clear the 34T. (Unless you have 3 hands, you'll have to remove the derailleur to do this.)

 Tempat Permulaan & Tamat : REDEEMS Centre, Km2, Jalan Apar-Segong, Singai, Bau, Sarawak.


